After spending a lot of time on a smaller screen, a projector can come as a great change. Projectors are typically used for casual movie nights at home, but some basic projector knowledge can also come in handy at the office.
That’s why it is very important that you learn how to operate one. If you’re looking for the simplest method on how to duplicate screen on projector, I’m here to offer my experience with projectors and screenings and help you easily complete the task.

How to Duplicate Screen on Projector
Although I’m here to talk about duplicating screens on a projector, the setup is configured using the source device – the computer. Therefore, the procedure of reproducing screens is slightly different between operating systems.
Whether you’re using Windows or macOS, you can duplicate the screen using shortcuts and hotkeys. Depending on your keyboard, you may have some dedicated keys for manipulating the screen, reducing the entire procedure to a single button click. If you want to learn more about duplicating a screen on a projector, read the following short guides:
Windows
Duplicating the screen between a projector and a computer using Windows is quite straightforward. The first thing you need to do is navigate to the desktop. Right-click on any free space on the desktop, and a drop-down menu will appear.
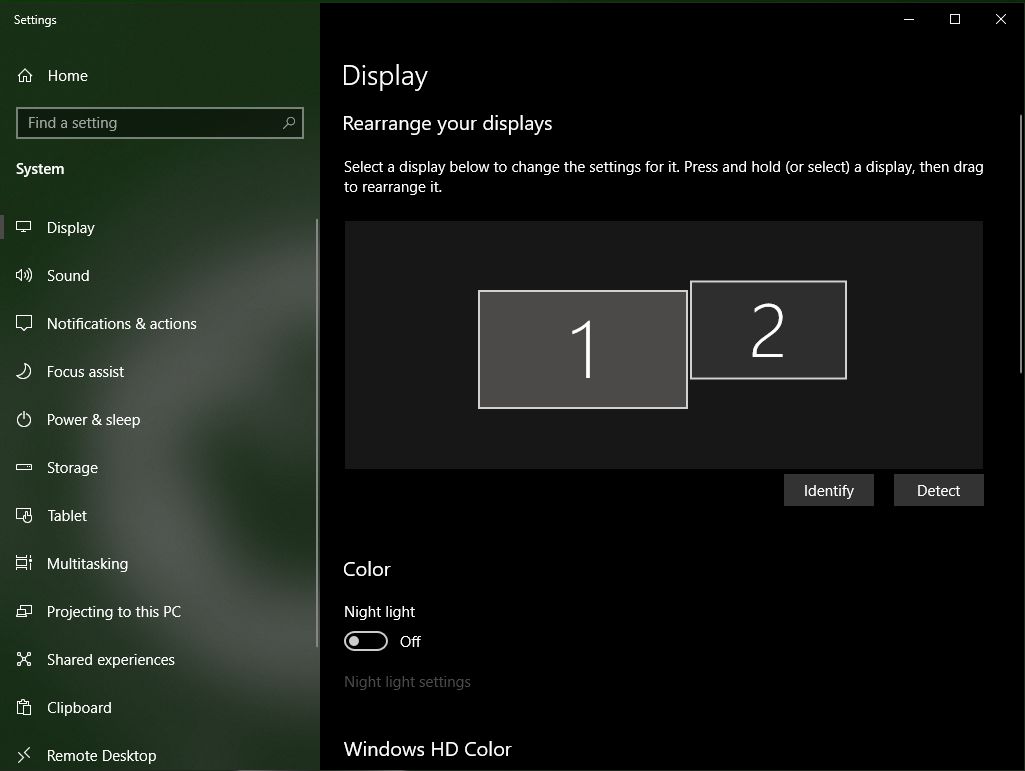
From the drop-down menu, pick the option named Display Settings. That’ll display a new menu dedicated to all the display settings you can customize. Scroll through the available options until you find a setting called Multiple Displays.
Your projector screen should be automatically detected, but if you don’t see it in the list, you’ll need to press the ‘Detect’ button for the system to locate your projector.
Once the projector appears on the list, you can choose Duplicate Display, and the screen’s content should immediately duplicate to the projector.
Windows using hotkeys
If the above procedure seems time-consuming, you can simplify the process by using hotkeys. Here’s how you can do it:
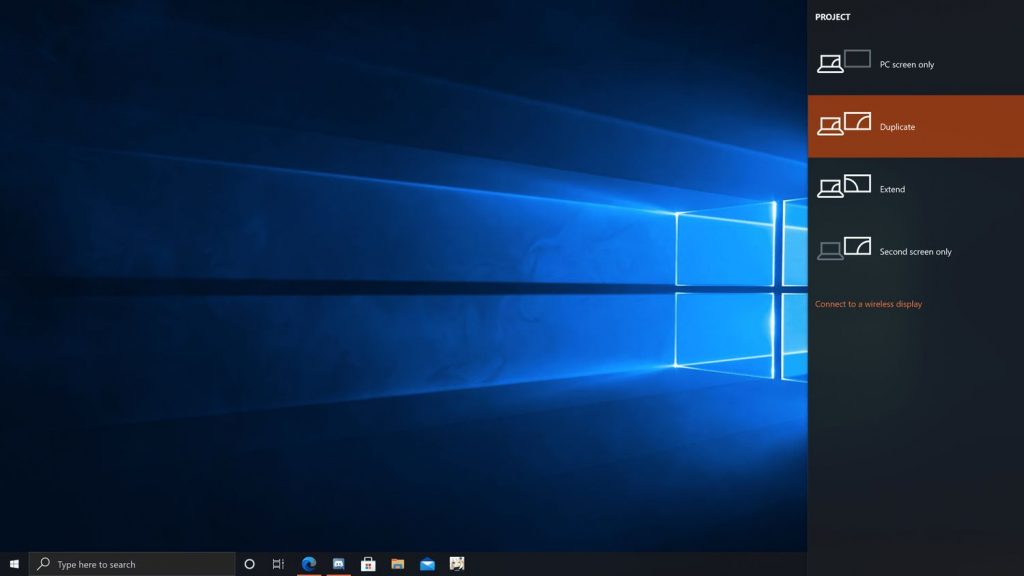
- Hold the Windows key and press “P” on the keyboard. A side menu will appear to the right of the screen.
- ‘Duplicate’ is the second option on the side menu. Click on it, and the screen will be shared between the computer and projector.
macOS
Sharing your screen between a projector and a macOS device is even simpler. You just need to navigate to the settings options, and the rest of the procedure is quite straightforward.
The first thing you need to do is find the Apple logo in the upper left corner of the screen. Press the logo, and find the System Preferences option. Here, you can customize many features, but what you need to find is the Displays menu. After entering Displays, go to Arrangement. Here you’ll find the desktop and projector displayed in a line.
Below that, you will see a Mirror Displays checkbox. Click on it to mark it as checked, and your projected image will be a duplicate of the desktop screen.
Read more: How to Measure Projector Screen

Troubleshooting Problems
Sometimes while searching how to duplicate screen on projector and try to do it, you might have some issues.
There are several reasons you may be unable to share the screen between your computer and projector. These involve screen resolution issues, incompatible drivers, etc. Here’s how you can troubleshoot errors when you cannot duplicate the screen.
Switch the graphics card driver to compatibility mode
The first thing you can try if you’re struggling with duplicating the screen between your computer and projector is to check the graphics card driver.
To do that, you’ll need to download and install the latest graphics card driver compatible with your system and run it in compatibility mode. That’ll allow troublesome programs to run without problems.
After installing the driver, right-click the program you want to screen and choose Properties from the drop-down menu. Open the compatibility tab, check the Run this program in compatibility mode, then select the OS. That’ll perform optimization of the display and prepare it for projection on your projector screen.
Change your main screen’s resolution
Some projectors may have difficulty duplicating the screen if your computer’s screen’s resolution is different from the resolution of the projector’s screen. You’ll need to change your computer’s resolution to troubleshoot the issue. Here’s how you can do it:
- Right-click on your desktop, then click the Display Settings option.
- Under the Display Resolution section, you will find the current resolution of your screen.
- Tap the resolution to change it, and set it to match the projector’s resolution.
- Save the changes, and re-connect your projector to the computer to see whether the problem has been solved.
Update the graphics card settings
Your graphic card software may be overriding the settings made in the OS, causing the duplicate screen feature not to work, even if it is picked from the OS’s settings.
Therefore, you’ll need to go to the graphics card settings and check whether it is still set to a single display. If that’s the case, you’ll need to change the setting and set it to the duplicate option, which will solve your problem.
The name of the graphic card software depends on your graphic card. If you’re using an Intel graphics card, you’ll need to search for the keyword Intel, which will display the Intel graphics command center application.
You’ll find the setting for Intel under Display > General > More Options. Then, click the mirror option, and choose the monitor you want to share with your projector.
For other graphic card brands, customizing the setting may be slightly different, but it will follow a similar pattern. If you’re having difficulties, you can always reach out to the user’s manual or run an online search to customize the settings of your specific graphics card.
Also read: How to Build a Projector Screen Frame
Conclusion
We hope you have found all the useful information on how to duplicate screen on projector, and now you can easily do it.
Enjoy it whether in your office or at home!