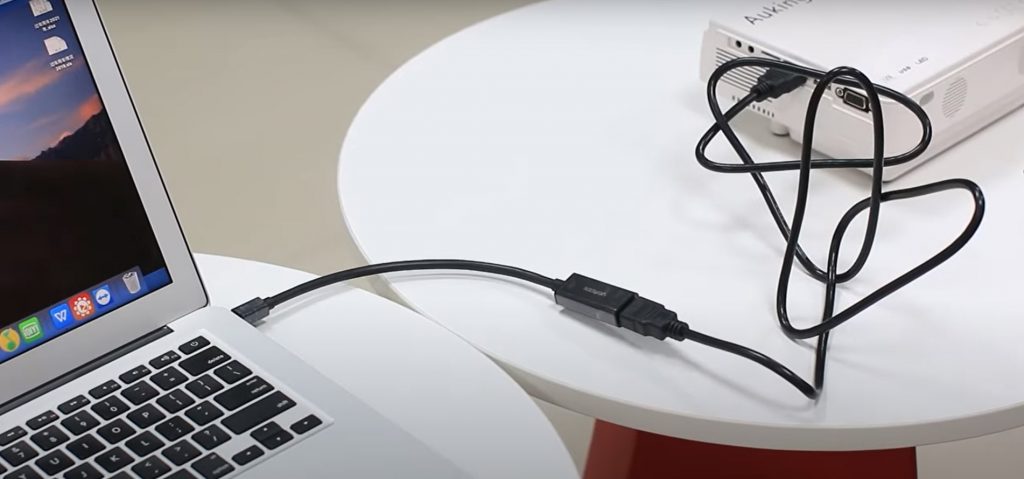
Do you have to present a project you worked so hard on to fellow students using your MacBook? You would probably want to use a projector. If you have never made a connection between these types of devices before, in this article, we will tell you how to connect Macbook to projector quickly and efficiently.

Identify All the Ports on Your MacBook
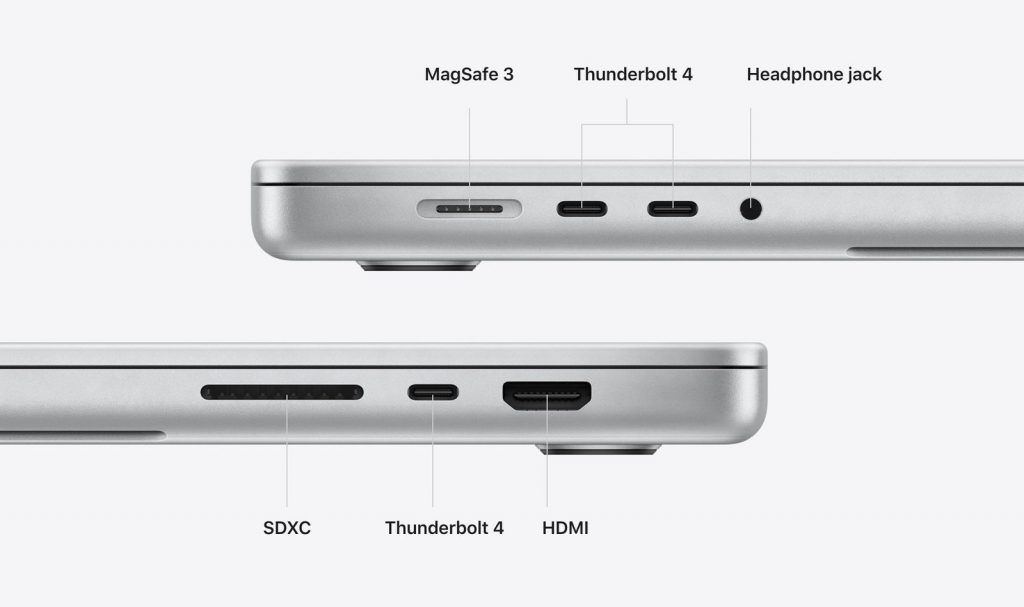
The first thing you have to check is what sorts of connection ports your MacBook has. Some MacBooks have a standard HDMI port, and others also have a MiniDisplay port.
Apple usually sends a user guide along with the MacBook, so by reading them, you can easily see which ports are available. The ports also have some kind of symbol or a name engraved next to them, so look for that too. But just in case, these are the ports you will need to connect your Mac to a projector:
- HDMI port – If you have this port on your Mac, you can easily connect the projector with it, using only an HDMI cable. You don’t need an adapter, and the cable usually comes with the projector.
- MiniDisplay port – This port is just what the name implies, a smaller version of the standard HDMI port. To connect the standard HDMI cable to the Mac, you will need an adapter, a male MiniDisplay connector to a female HDMI connector. Be sure to check if the projector comes with this sort of adapter.
- Thunderbolt or USB-C type connector: You will need a special adapter that converts the ports and converts the signal type, but we will talk about this in the lower section.
Wired Connection
The wired connection is the most common way of connecting a projector to any computer. It is a very fast, reliable, and stable connection. But as we’ve said earlier, you need to identify the types of ports available both on your MacBook and the projector. Now we will discuss all the possible ways you can turn your Mac into a projector using the wired method.
HDMI to HDMI
If your Mac and the projector have a standard HDMI port built-in, this will be the easiest way to connect them. You need to have an HDMI cable, and that’s it; just plug it in, and you’re done!
HDMI to VGA
Let’s say you’re in a situation when you will have to connect your Mac to an older type of projector; what then? Older projectors usually have a VGA(Video Graphics Array) port.
If this is the case, you will need an HDMI to VGA adapter. You will need to buy this adapter separately because it’s not so common and does not come included with products. All it does is convert the signal from the newer HDMI to the older VGA-type display.
A thing to note is that audio will not be converted since the VGA port does not support audio. But don’t worry; these adapters usually have a 3.5mm jack if you wish to output audio on external speakers. You can also do that by directly connecting any external speakers to your Mac via the headphones jack.
MiniDisplay to HDMI or VGA
If you have to connect from a MiniDisplay port on your Mac to an HDMI port on your projector, you will only need a special cable, not an adapter. This cable only converts the size of the ports, while the wiring inside and the signal remain the same.
On the other hand, if you want to connect a MiniDisplay port Mac with a VGA port projector, you need a special adapter. The same instructions apply here as in our previous section, where you had to connect a standard HDMI to VGA. The only difference is the HDMI port size.
Read more: How to Connect MacBook to Projector Wirelessly

Thunderbolt or USB-C to HDMI or VGA
The thunderbolt and the USB-C type of ports are physically the same, with their difference being the speed of data that they can transfer. Thunderbolt is significantly faster than USB-C, so it is a great way to connect a projector if you have no other option.
The adapter you will need to make this kind of connection will probably be the most expensive one. That is because it converts a data information signal into a video signal.
These adapters are a little bulky, and besides the HDMI or VGA output ports, they can also include additional USB ports and even an SD-Card slot. But the principle of connecting is the same, with the only difference being the adapter type.
Wireless Connection
Our “how to connect Macbook to projector” article also includes a wireless way to connect your MacBook to a projector. This is a relatively convenient way to connect these two devices without buying any adapters or wires. But bear in mind that this will not always be a stable connection. You may experience crashes and a loss of signal and performance from time to time, depending on the quality of the network.
The only thing you need to know to wirelessly connect a MacBook to a projector is to ensure that the projector has a built-in wifi receiver. The new and more modern projectors also have Bluetooth adapters built-in, so you can also keep an eye out for that.
Also read: How To Connect Projector To Laptop Without VGA Port
Fine-tuning your MacBook for Better Display Results
After you’ve made all the necessary connections between the two units and the projector starts working, you can skip this step if everything is to your liking. But if you feel like there are some things out of place or the picture looks distorted, keep on reading.
To make some modifications to the display settings, do the following:
- Go to and select the “System Preferences” option from your Dock.
- Select the icon named “Displays.”
- Once there, you can select the option “Optimize for” under the Display tab. You should see your projector’s name under this option; if so, select it. This will best optimize all the display settings for your projector automatically.
- There is also an option under the “Arrangement” tab that lets you select whether you want to use your projector as a second screen or if you want it to display the same content that is on your Mac. This is the “Mirror Displays” option.
Bottom line
We hope this article gave you some general guidelines on how to connect Macbook to projector. The steps are pretty straightforward. Simply read the article carefully, and you will be all set!